Come see my other blog, no cooking just the weirdness that is my life

Neo's World
You won't be sorry, and it will make your family seem normal...

Monday, February 11, 2008

Sliders anyone?

OK, before I get into this endeavor into redneck culinary art, I feel I must say something. I will get to the suggestions soon, but I have been wanting to make these for a while. Finally I said to myself, is said, "Self make them", so I did.

If you are like me and have self inflicted upon yourself a lack of small tasty burgers, some call them sliders, crystals, etc. I call them good eats, um my lawyer says I can't say that...so eats that are good. That'll do. You do know what I speak of don't you? Steamy little burgers, cooked in onions and served piping hot in little paper boxes?

http://www.whitecastle.com/_assets/images/food/menu/hamburger_lg.jpg
Yeah that look real doesn't it? I bet it tastes as good as it looks.

http://static.flickr.com/3/4650555_0932b22712_m.jpg
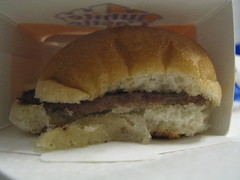
Sometimes deliciousness isn't pretty, but sometimes pretty isn't delicious.

OK the basic ingredients, you will need some
Small buns, dinner rolls are perfect size, I got potato rolls, fitting for Idaho if I must say so myself.

Dehydrated onions, reconstituted

Cheese, american, I used white american, I'm racist like that

Pickle chips

Mustard

1 lb. Ground beef

Salt

Pepper

And anything else I mention along the way


Mix burger with salt and pepper to taste, I don't recommend you tasting the raw burger, but just what looks good.


Place about half on a piece of plastic wrap that is twice as long as it is wide, fold over. Roll out until it fits plastic wrap, it should be about 1/16th inch to 1/8th inch thick. Score meat so that is is 4 by 4 with something like a table knife, not sharp, you don't want to cut the plastic. With finger press five holes in each piece of the meat sheet.


Place on rack and put in freezer. Prepare the other half as you did with the first half and freeze too.

While waiting for that to harden up in the freeze, you can prep the rest of the ingredients.

Daddy, daddy take a picture of me!

(Like her shirt? I designed it, it says "ELF SIZED DEAL WITH IT")

Put dehydrated onions in bowl about 1/2 cup with 1 cup of cold water and lets set to rehydrate.
(Pictures were too blurry, but you get the picture. I crack myself up.)

If your buns aren't split you will need to do that too. Thanks God for electric knives.


Cut cheese slices in fourths.


*eats way too many pickles*

Place about 1/4 of the onions an some of the liquid on griddle, and electric on if you have it, I wish I had one. Anyway turn heat to about medium high.


Remove one meat sheet from freezer, hopefully it is frozen by now, if not you will need to wait on the griddle until it is. Remove plastic from meat, unless you favor the taste of burnt plastic with your burgers, in that case you can leave it on. Place on hot griddle. Put bottom of buns on meat, one bun per meat portion.


Place a lid on it to steam them, or in my case a large roasting pan.


While steaming place mustard, pickle and cheese on top bun portion.


When meat is done and before onions burn, remove from heat and place on bun tops.

A work of tummy rumbling art.


There isn't a White Castle around here, I miss them sorely. These are a suitable substitute, maybe even better.


Tuesday, January 29, 2008

OK what do you want?

I said I was holding off for a while on the cooking posts, but I can't stand it any longer. I must cook something delicious and share it, not the food that is all mine, but the pictures which while not nearly as tasty I enjoy sharing them.

So what will it be? I will pick a winner and they will win a "themaninthekitchen" tee shirt if there is ever such a thing.

Tuesday, January 8, 2008

Microwave cleaning tip

Well trying to get the house in selling condition takes up a lot of time, so probably no food posts up in the near future. So I decided to go with a tip that helps me a lot.

I don't know if everyone else's microwave gets as nasty as mine does, but it helps to have a method that makes cleaning it a breeze.

What I do is take your standard kitchen cleaner and throughly spray the interior of the microwave including the inside of the door until it is dripping. Then place a microwave safe bowl half filled with water inside. Set it for about 4 minutes on high and let it go. After the timer goes off let it sit for 5 minutes or so, then open and carefully remove the water bowl, it will be very hot.

Then just wipe the muck up with a rag, it comes off real easy, for me anyway.

Hope this helps, and until next time...

Wednesday, January 2, 2008

Mexican Spiced Steak with Chipotle con Queso Sauce

As I sit here eating my Big Mac and contemplating what I have just cooked, I realize I should have ate what I cooked. Oh well such is life.

Whew, this one took a while to prepare and get photographed, I hope you appreciate it and show that appreciation with many checks in the mail.

OK to start out I couldn't find the type of steak I needed anywhere, and after visiting 3 stores I settled on a chuck steak about 2 inches thick and weighing in at over 2 pounds, this was going to take some disassembling.


And now rub them babies down with the following dry rub.

2 TBS grill seasoning
Grated zest of two limes
1 1/2 tsp ground cumin
1 1/2 tsp chili powder


Yummy, but I will wait until it is cooked.

Melt 2 TSP of butter in a medium saucepan and them add 2 TSP of flour.


Make a paste a cook over medium heat for 1 to 2 minutes stirring constantly, then add 1 1/2 cups of milk.


OK you have made a simple white sauce, yay! Now just cook over medium/high heat until it is thick and bubbly. Then add 1 1/2 cups of shredded smoked cheddar cheese 2 TBSP of finely chopped canned chipotle chiles in abodo sauce, salt to taste. Stir and put heat on lowest setting to just keep warm. This is your queso sauce.


OK now the meat, alright. *grunts and does manly things*

Preheat your oven to 500º F. Take you favorite cast iron skillet and coat it with extra virgin olive oil. Put it in the oven to heat up as the oven is preheating. Now 500º is as Alton Brown might say, "Rocket hot".


When oven lets you know it has reached approximately the temperature of the sun carefully remove the skillet from the oven and place on burner that has been set to high. Add seasoned meat.


And let cook for about 1 minute. When that minute has expired, flip over and repeat.


Then return pan with meat to rocket oven and set a timer for 4 minutes, flip and repeat 4 minute timer. At that time remove from oven and and transfer to cutting board. cut meat against the grain on the bias in strips as thin as you can. The thinner the better, since this meat isn't the most tender, the shorter the grain fibers the more tender it will seem.


And the scene of the crime. Isn't it lovely? I don't like my meat rare but I must admit I immediately partook of the bounty.


OK also by request I made another sauce to go along with this delicious meat. It is chimichurri, sound like the name of a song from some musical about a car that I saw a lifetime ago. It turned out lovely. It is a sauce from Argentina that is very good I was eating it just by itself all night long, yummy.

Alright so a quick rundown.

1/2 cup EVOO


1/4 cup water, 1/4 cup red wine vinegar


1 medium onion finely chopped.

You need one of these chopper babies. Very nice.


2 cloves of garlic finely chopped. (I cheat on this)


1/2 red peper finely chopped


1 small tomato seeded and finely chopped.


1 TBSP of dried oregano and 1 TBSP of dried paprika (for the love of God I don't know why but when I was making it I read parsley, which is what I used.)


1 tsp course salt


1 tsp ground black pepper and chili flakes to taste (used chili powder even though I specifically bought chili flakes for this recipe, GRRRR!)


Stir to bring together, and let sit for 30 minutes minimum.


And now let the mouthwatering commence. Steak with Queso sauce.


And with the Chimichurri sauce.


I suppose I should give credit where credit is due, this recipe was losely based upon Rachael Ray's Recipe found here.

OK kiddies I am pooped, this was a long one. And until next time...Good night.

Monday, December 31, 2007

The Best Peanut Butter Cookies you will ever have

OK so I didn't chicken out and decide not to do it. I finally got the kids to bed and assembled my ingredients, I had everything I needed, it must have been a sign. *cue lightening strike*

This recipe is very simple and anyone can make it and have success, I think the main thing is watching the cooking time. They may seem underdone when you take them out, but give it a little time and they will be perfect. And by a little time I mean let them cool down enough so that you don't need to be rushed to the ER with a melted mouth.

Alright take out a medium or large mixing bowl. If you have one of those fancy smancy stand mixers use a bowl that goes with it.

Then add 1 cup of light brown sugar.


Plop!


And then using your handy dandy slide measurerer to measure out 3/4 cup peanut butter (I use crunchy, but creamy will work too). If you don't have a slide measurerer what are you doing cooking, you are a disgrace to the cooking world, you should be punished. They are really handy, go get yourself one. Oh and slide measurerer is a made up term of mine, I don't know the what a professional might call it.


Sluuup!

Now for the shortening 1/2" cup to be exact or there abouts, whatever.

Sker-plunk!

And now one solitary egg.


Crack! Plop!

Enter the mixmaster...no we aren't blending DNA to make new lifeforms, but we are blending various ingredients to form a delicious confection (are cookies a confection? OK lets say a small flat round cakes or for you UKer's, biscuits).

Eww, blurry, oh well.

Prepared to be mixed and mastered you evil scum...ok I am keeping my day job...for now...

I suppose the proper term is cream, cream the aforementioned ingredients together.


OK now for the dry stuff, my recipe says to sift these all together but I think it makes the cookies too light, or it could be that I am just too lazy. I will never tell.

Add 1 1/2 cups of AP flour.

Look at me holding two cups in one hand, and my teachers said I would never amount to anything. If they could only see me now.

Back down to business. 1 tsp baking soda.


Add 1/2 tsp salt. I never measure small amounts of salt, eh that looks about right.


Now integrate the ingredients together. "Integrate" did you like that big word? It only took me 15 minutes to find the correct spelling.


And the final result with the mixer.


Now for some manual labor, prepare the hands. I like to use gloves so I am not picking peanut butter and such out from under my finger nails for the next few days. Machines can do a lot of things but they can't seem to bring peanut butter cookie dough together properly.


And here we have it.


Form into 1" balls I usually get about 24 of these.


And place on cookie sheet.


And give them the old fork smash.


All smashed and ready to go...


...in the oven, oh I probably forgot to mention preheat the oven to 350º.


For 10 minutes.

Cooking...


And then remove from oven with something that allows your hand to remain in it's normal working order.


Then after a minute or two move to cooling rack, carefully, these cookies are crumbly when hot.


Lovely, no?


And they go with milk nicely.


Ok so I had better get the rest of them in the oven...

Hey where did they go?


So that is about it my children, lets recap shall we?

Preheat oven to 350º F

In mixing bowl combine,

1 cup light brown sugar packed
3/4 cup peanut butter, crunchy or creamy
1/2 cup shortening
1 large egg

Cream together in mixer until smooth.

Then add,

1 1/2 cups all purpose flour
1 tsp. baking soda
1/2 tsp. salt

Mix all together until you have a crumbly mixture, then finish by creating a ball of the whole mixture with your hands. Form into 1" balls and place on cookie sheet. Smash with a fork in a criss-cross pattern. Then bake for 10-12 minutes. Remove from oven and transfer to cooling rack. Let cool and enjoy. Makes about 2 dozen.